SSL Certificate Installation for Lync 2013
If you have not yet created a Certificate Signing Request (CSR) and ordered your certificate, see
Lync 2013 CSR Creation.
Install Your SSL Certificate with the DigiCert® Certificate Utility for Windows
We recommend using the DigiCert® Certificate Utility for Windows to simplify the process of installing your SSL Certificate for Lync 2013. If you want to use our utility to install your SSL Certificate, do the following
- Generate your CSR.
- Import your SSL Certificate
- Export your SSL Certificate.
If you have multiple computers on which you want to use the SSL Certificate, or if you want to backup your SSL Certificate, export your SSL Certificate using the DigiCert® Certificate Utility for Windows.
If you want to use the Lync 2013 interface to install your SSL Certificate, follow the instructions below.
How to Install your SSL Certificate in Lync 2013
- From the Windows start menu click on Lync Deployment Wizard icon.
- Click on Install or update Lync Server System.
-
Under the Request, Install or Assign Certificates section click Run.

-
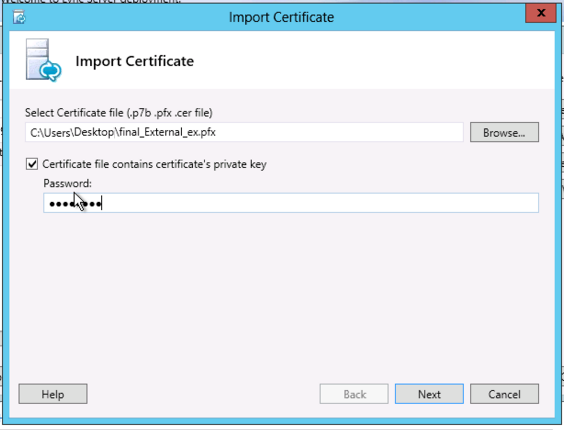
Choose External Edge Certificate and click Import Certificate.

-
Use the Browse button, and locate your certificate file (will be .pfx if you used DigiCert Windows Utility. If using a .pfx file be sure to check the Certificate file contains certificate’s private key checkbox). (Will be .cer if you use the Lync interface to create the CSR).

- On the Summary page verify your information is accurate and click Next.
-
On the Executing Commands page ensure Task Status is completed, and click Finish.

-
When returned to Certificate Wizard main page, click on External Edge Certificate, then choose Assign.

- Choose Next.
-
On Certificate Store you can choose Next, or view the certificate if you’d like to verify you’ve installed the correct certificate.


-
On Executing Commands page ensure Task Status shows completed, then click Finish.

- To verify your certificate has been properly installed, look at the status column to ensure the External Edge Certificate is showing Assigned.
Your certificate has been installed.
Import from PFX
If you’ve already created a certificate on another server, use the following instructions to import the certificate in a .pfx format to Lync 2013.
-
Select External Edge Certificate and click Import Certificate button.
-
Choose the PFX file and enter the password.
- Walk through the rest of the wizard.
